1
2
3
4
5
6
7
8
9
10
11
12
13
14
15
16
17
18
19
20
21
22
23
24
25
26
27
28
29
30
31
32
33
34
35
36
37
38
39
40
41
42
43
44
45
46
47
48
49
50
51
52
53
54
55
56
57
58
59
60
61
62
63
64
65
66
67
68
69
70
71
72
73
74
75
76
77
78
79
80
81
82
83
84
85
86
87
88
89
90
91
92
93
94
95
96
97
98
99
100
101
102
103
104
105
106
107
108
109
110
111
112
113
114
115
116
117
118
119
120
121
122
123
124
125
126
127
128
129
130
131
132
133
134
135
136
137
138
139
140
141
142
143
144
145
146
147
148
149
150
151
152
153
154
155
156
157
158
159
160
161
162
| import sys, os, glob
import numpy as np
import dlib
import cv2
predictor_path = r'./model/shape_predictor_68_face_landmarks.dat'
face_rec_model_path = r'./model/dlib_face_recognition_resnet_model_v1.dat'
faces_folder_path = r'./faces/'
detector = dlib.get_frontal_face_detector()
predictor = dlib.shape_predictor(predictor_path)
LEFT_EYE_POINTS = list(range(42, 48))
RIGHT_EYE_POINTS = list(range(36, 42))
LEFT_BROW_POINTS = list(range(22, 27))
RIGHT_BROW_POINTS = list(range(17, 22))
NOSE_POINTS = list(range(27, 35))
MOUTH_POINTS = list(range(48, 61))
OVERLAY_POINTS = [
LEFT_EYE_POINTS + RIGHT_EYE_POINTS +
LEFT_BROW_POINTS + RIGHT_BROW_POINTS +
NOSE_POINTS + MOUTH_POINTS,
]
FEATHER_AMOUNT = 11
def get_landmark(image):
face_rect = detector(image, 1)
if len(face_rect) != 1:
print('No one face in one picture')
else:
return np.matrix([[p.x, p.y] for p in predictor(image, face_rect[0]).parts()])
def transformation_from_points(p1, p2):
p1 = p1.astype(np.float64)
p2 = p2.astype(np.float64)
c1 = np.mean(p1, axis=0)
c2 = np.mean(p2, axis=0)
p1 -= c1
p2 -= c2
s1 = np.std(p1)
s2 = np.std(p2)
p1 /= s1
p2 /= s2
U, S, Vt = np.linalg.svd(p1.T * p2)
R = (U * Vt).T
trans_mat = np.vstack([np.hstack(((s2 / s1)*R, c2.T-(s2/s1)*R*c1.T)),
np.matrix([0., 0., 1.])])
return trans_mat
def warp_image(image, M, dshape):
output_image = np.zeros(dshape, dtype=image.dtype)
cv2.warpAffine(image, M[:2], (dshape[1], dshape[0]),
dst=output_image, flags=cv2.WARP_INVERSE_MAP,
borderMode=cv2.BORDER_TRANSPARENT)
return output_image
def draw_convex_hull(img, points, color):
points = cv2.convexHull(points)
cv2.fillConvexPoly(img, points, color)
def get_face_mask(img, landmarks):
img = np.zeros(img.shape[:2], dtype=np.float64)
for group in OVERLAY_POINTS:
draw_convex_hull(img, landmarks[group], color=1)
img = np.array([img, img, img]).transpose((1, 2, 0))
return img
COLOUR_CORRECT_BLUR_FRAC = 0.6
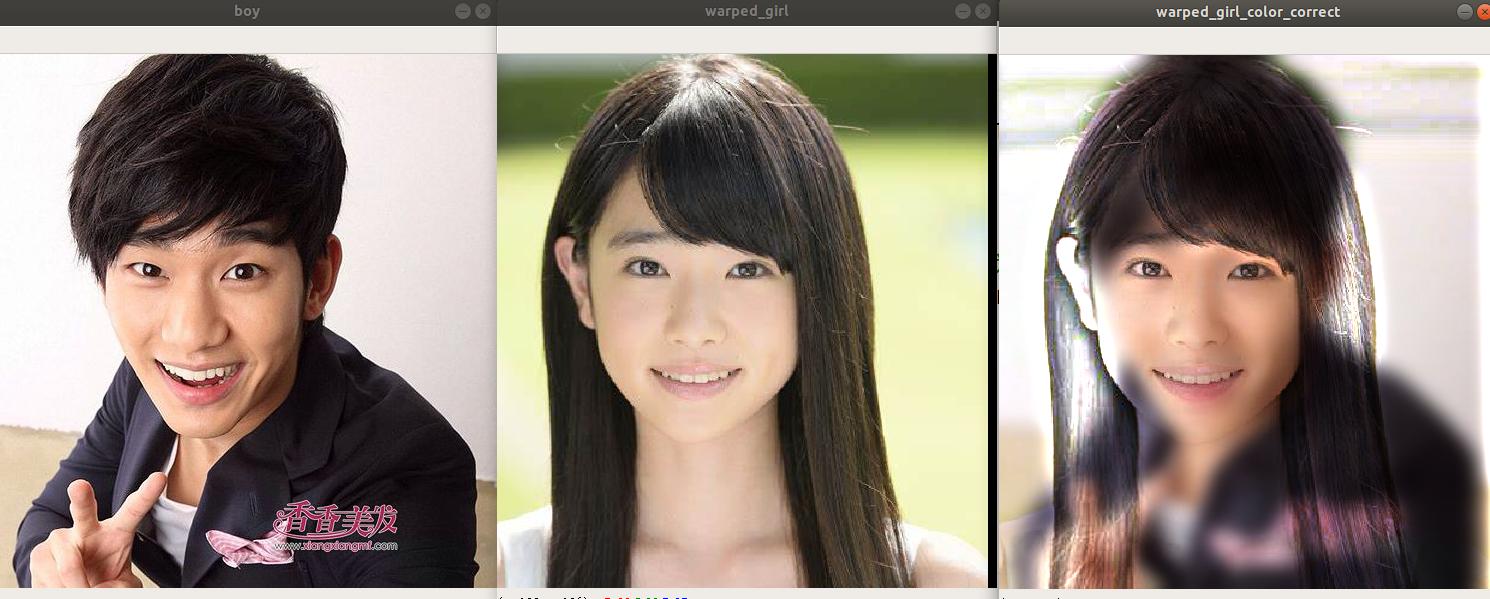
def color_correct(im1, im2, landmarks1):
blur_amount = COLOUR_CORRECT_BLUR_FRAC * np.linalg.norm(
np.mean(landmarks1[LEFT_EYE_POINTS], axis=0) -
np.mean(landmarks1[RIGHT_EYE_POINTS], axis=0))
blur_amount = int(blur_amount)
if blur_amount % 2 == 0:
blur_amount += 1
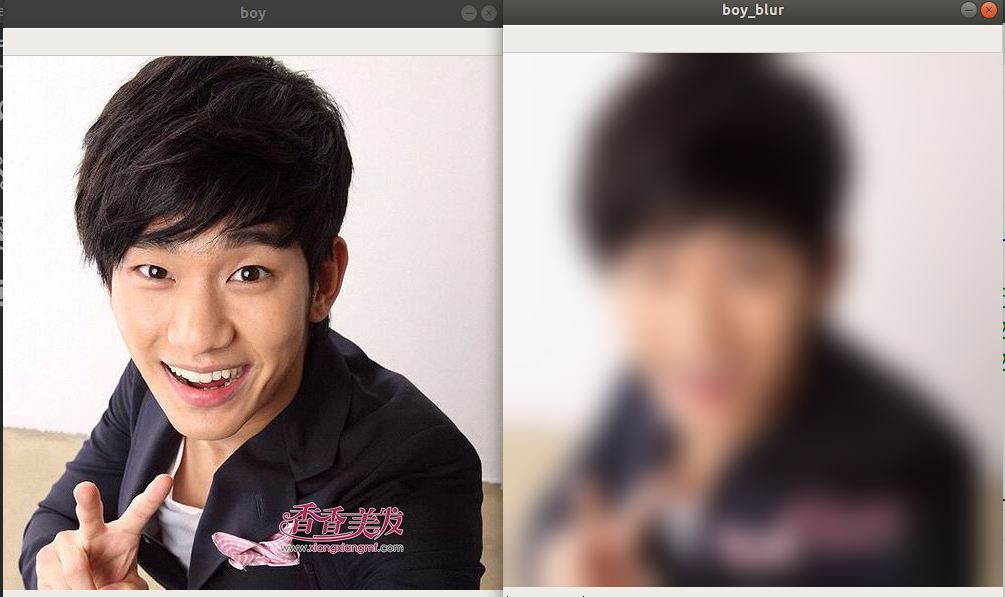
im1_blur = cv2.GaussianBlur(im1, (blur_amount, blur_amount), 0)
im2_blur = cv2.GaussianBlur(im2, (blur_amount, blur_amount), 0)
im2_blur[im2_blur < 1] = 1
im2 = im2.astype(np.float64)
im1_blur = im1_blur.astype(np.float64)
im2_blur = im2_blur.astype(np.float64)
im2_color_correct = im2 * im1_blur / im2_blur
im2_color_correct[im2_color_correct < 0] = 0
im2_color_correct[im2_color_correct > 255] = 255
return im2_color_correct.astype(np.uint8)
def change_face(img1, img2):
boy = cv2.imread(img1)
girl = cv2.imread(img2)
boy_landmarks = get_landmark(boy)
girl_landmarks = get_landmark(girl)
trans_mat = transformation_from_points(
boy_landmarks[OVERLAY_POINTS],
girl_landmarks[OVERLAY_POINTS]
)
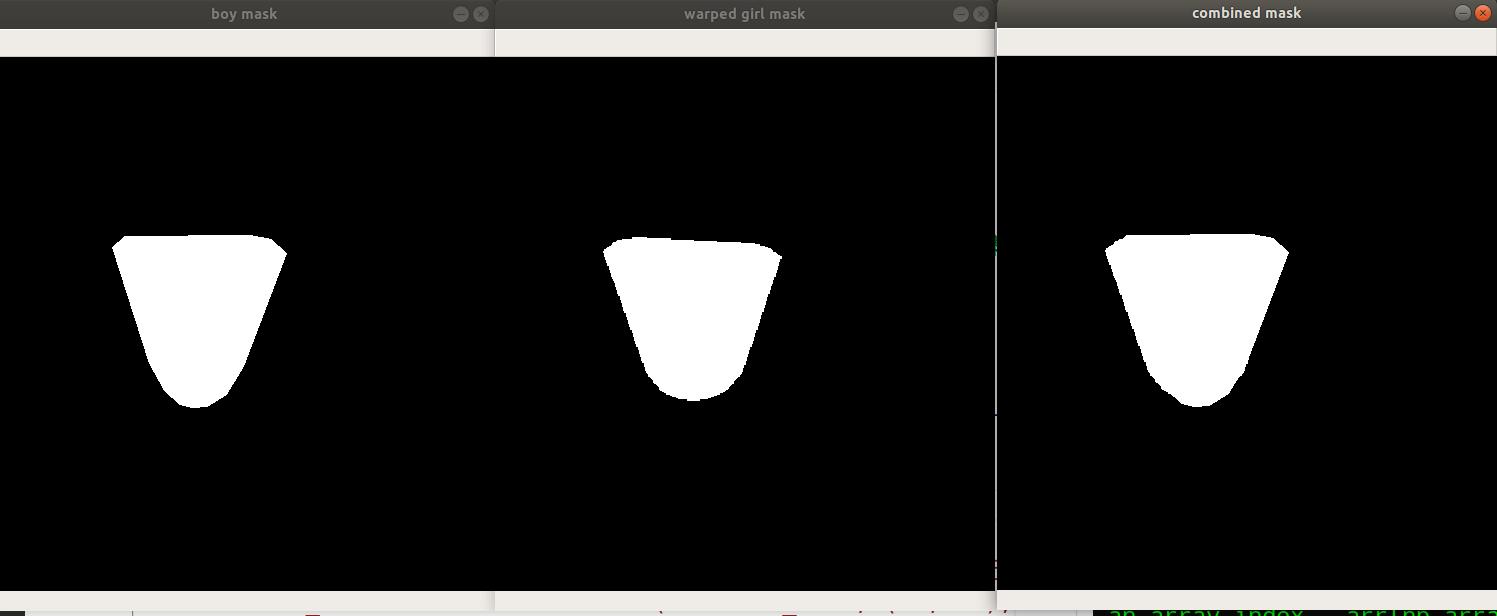
boy_mask = get_face_mask(boy, boy_landmarks)
girl_mask = get_face_mask(girl, girl_landmarks)
warped_girl_mask = warp_image(girl_mask, trans_mat, boy.shape)
combined_mask = np.max([boy_mask, warped_girl_mask], axis=0)
combined_mask = cv2.GaussianBlur(combined_mask, (19, 19), 0)
combined_mask = cv2.GaussianBlur(combined_mask, (13, 13), 0)
combined_mask = cv2.GaussianBlur(combined_mask, (7, 7), 0)
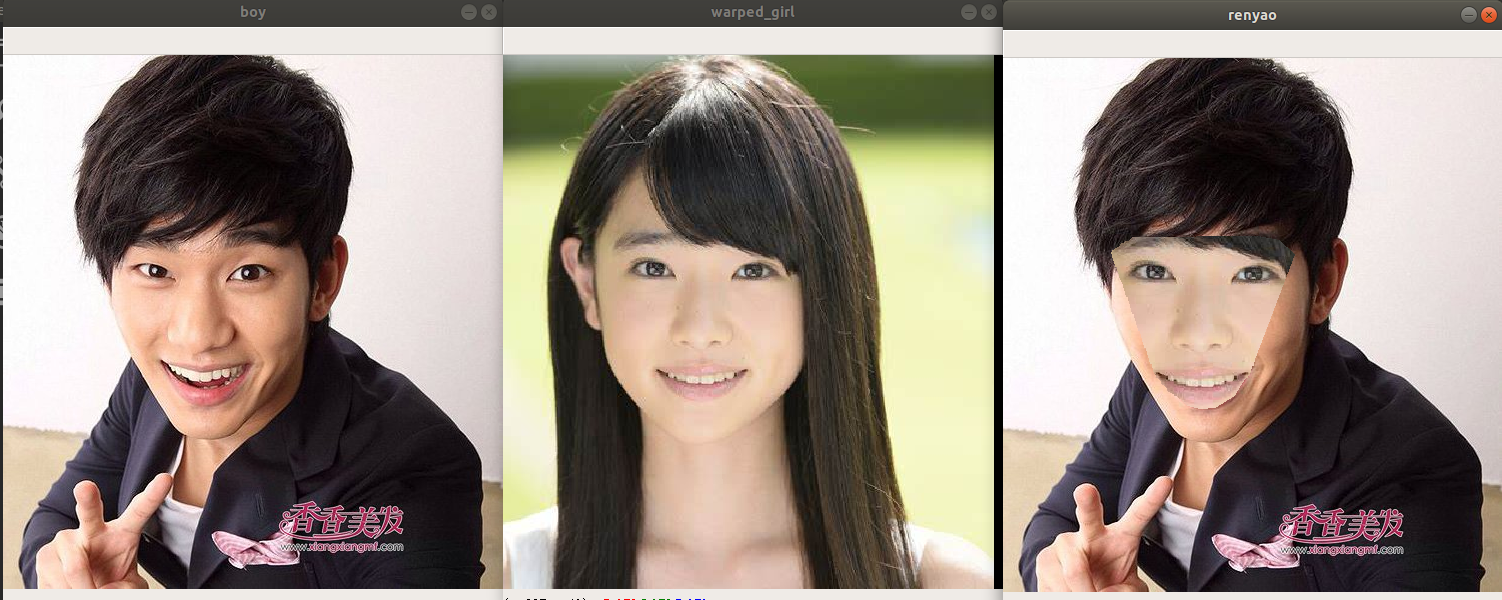
warped_girl = warp_image(girl, trans_mat, boy.shape)
warped_girl_color_correct = color_correct(boy, warped_girl, boy_landmarks)
boy = boy.astype(np.float64)
warped_girl = warped_girl.astype(np.float64)
renyao = boy * (1 - combined_mask) + warped_girl_color_correct * combined_mask
boy = boy.astype(np.uint8)
warped_girl = warped_girl.astype(np.uint8)
renyao = renyao.astype(np.uint8)
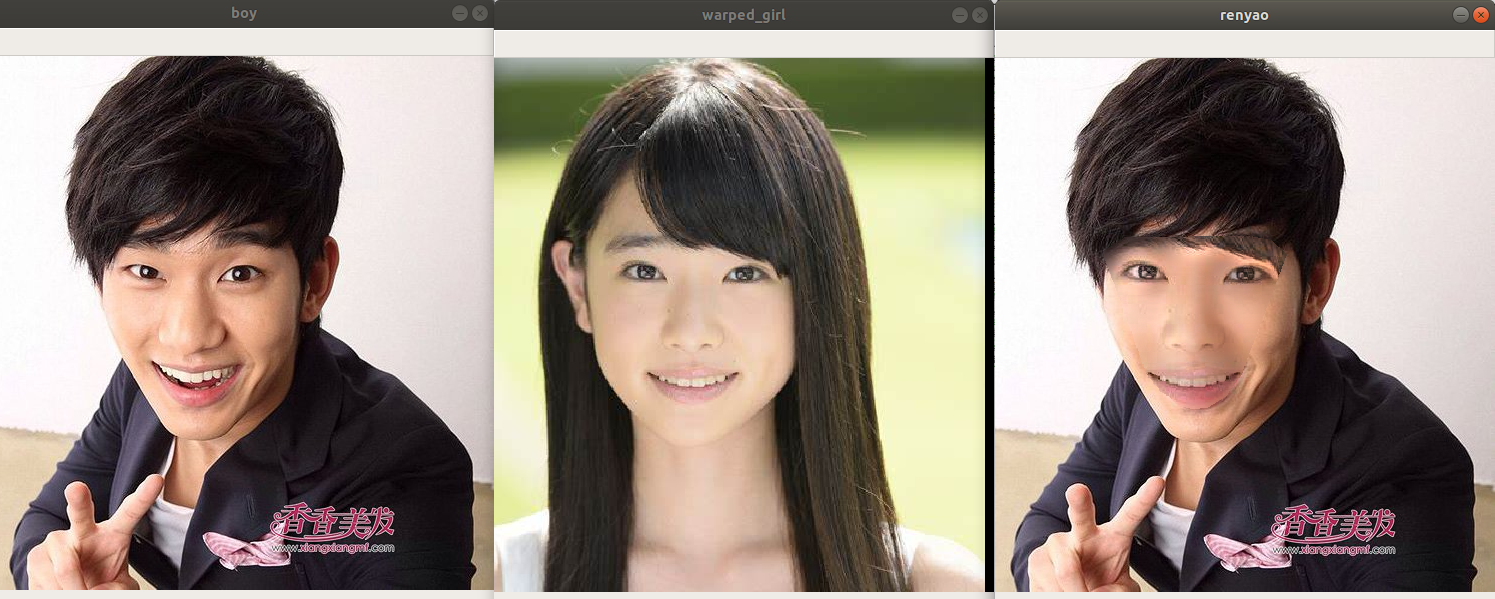
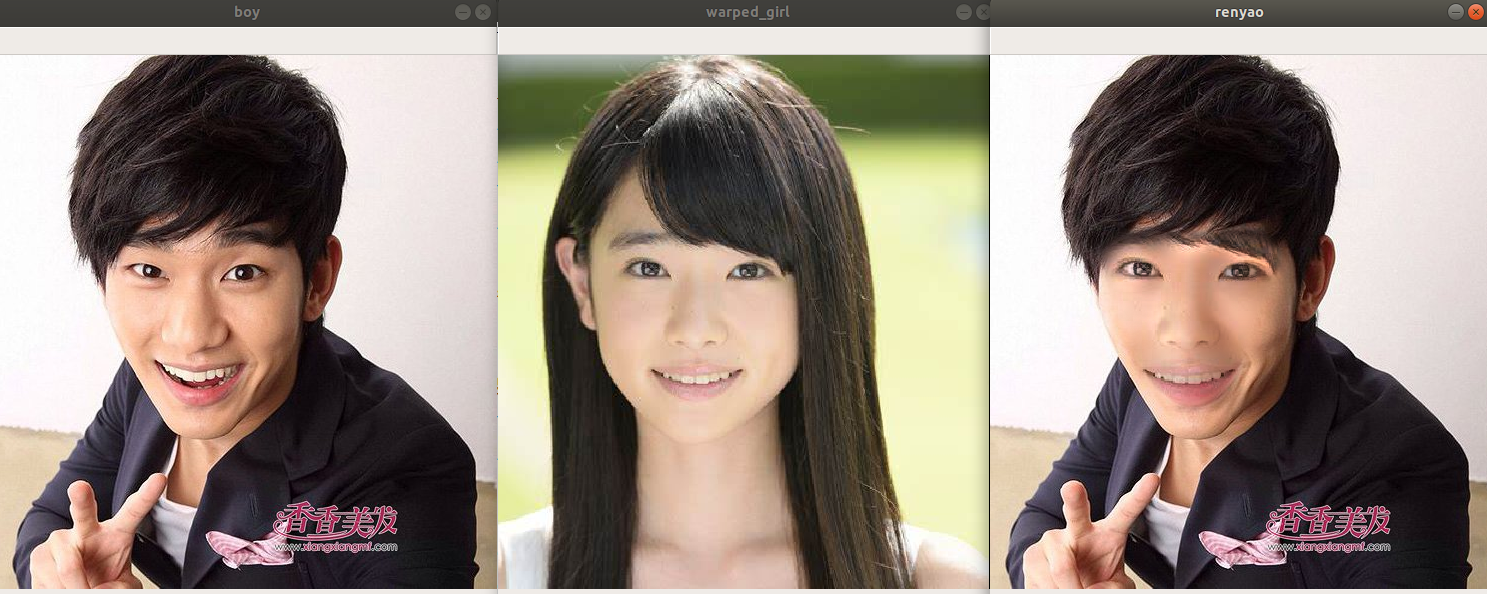
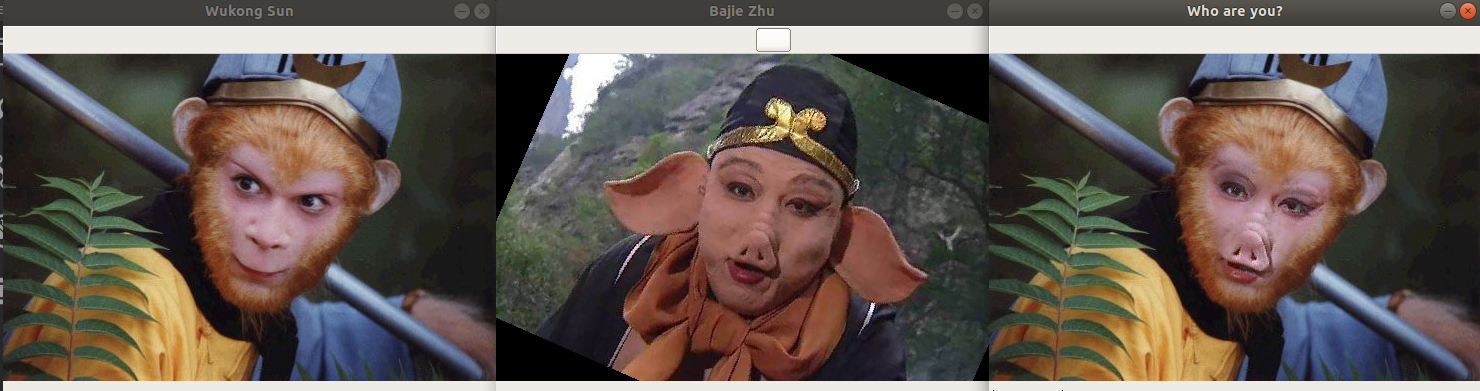
cv2.imshow('Wukong Sun', boy)
cv2.imshow('Bajie Zhu', warped_girl)
cv2.imshow('Who are you?', renyao)
cv2.waitKey(0)
change_face('faces/swk.jpeg', 'faces/zbj_2.jpeg')
|